Introduction
I recently explored the Segment Anything Model 2 (SAM 2) developed by Meta, and I was impressed by how naturally it handles prompt-based image segmentation. The model takes an image as a NumPy array plus point coordinates that tell it what to segment, but the awkward part is getting those coordinates from a real user.
To make the workflow practical, I paired SAM 2 with Gradio so users can simply click or draw on an image instead of typing raw pixel positions. That turns a research-style segmentation pipeline into something much easier to test and demo in the browser.
What is SAM 2?
SAM 2 is Meta’s second-generation Segment Anything Model. It keeps the strong zero-shot segmentation behavior of the original SAM while improving the architecture and extending the system to video use cases as well.
Some of the capabilities that make it useful:
- Zero-shot segmentation for arbitrary objects
- Point, box, and mask prompts
- Hierarchical image encoding for multi-scale features
- Streaming memory for video workflows
For this project, I focused on image segmentation with point prompts because that gives a clean way to build an interactive demo with very little manual labeling.
Extracting Coordinates from Images
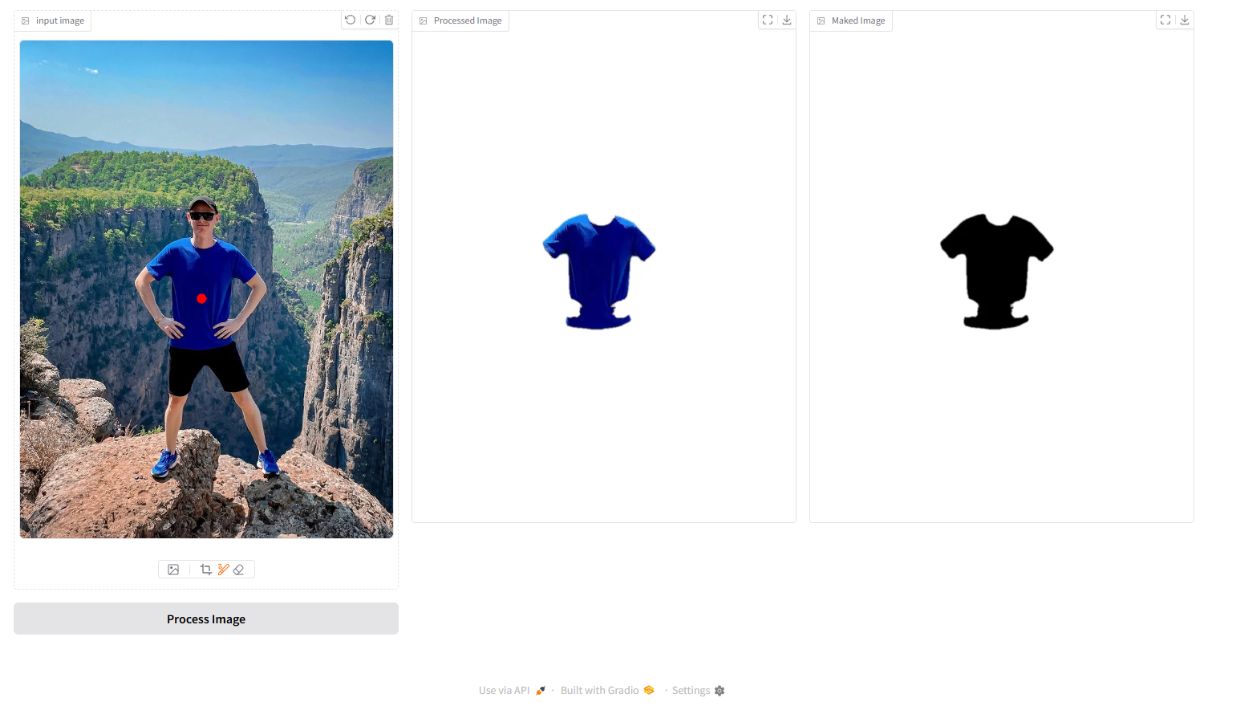
One of the core problems was converting a user action into coordinates the model could understand. Instead of asking the user to manually enter (x, y) values, I used image layers from Gradio and processed them as NumPy arrays.
The idea was simple: detect red-dot-like clusters in the drawing layer, then convert those highlighted pixels into prompt coordinates for SAM 2.
def extract_red_dot_coords(layer: np.ndarray):
    red_mask = (
        (layer[:, :, 0] > 200)
        & (layer[:, :, 1] < 80)
        & (layer[:, :, 2] < 80)
    )
    ys, xs = np.where(red_mask)
    if len(xs) == 0:
        return None
    return [[int(xs.mean()), int(ys.mean())]]
That approach makes the input feel natural. The user marks the object visually, and the backend translates that mark into a prompt point automatically.
Setting Up SAM 2
The setup centered on loading the model, preparing the image, and sending the prompt point into the predictor. Once the model and checkpoint were wired in, the rest of the flow became mostly about preprocessing and UI.
predictor = SAM2ImagePredictor.from_pretrained("facebook/sam2-hiera-large")
predictor.set_image(image)
At this stage, the important thing was to keep the interface between the UI and the model very small: input image, extracted point, predicted mask.
Running Segmentation
After the coordinates were extracted, the predictor generated a segmentation mask for the selected target. This is where the interaction becomes satisfying, because the user input immediately becomes a useful visual result.
masks, scores, _ = predictor.predict(
    point_coords=np.array(coords),
    point_labels=np.array([1]),
    multimask_output=False,
)
mask = masks[0]
Using a single positive point prompt kept the demo lightweight while still showing how strong SAM 2 is at zero-shot segmentation.
Isolating Points Using the Output Mask
Once the mask was returned, I used it to isolate the segmented region from the original image. The goal was not only to show the predicted mask, but also to produce a clean output image that clearly highlights the selected object.
def apply_mask(image: np.ndarray, mask: np.ndarray) -> np.ndarray:
    h, w = mask.shape
    result = np.zeros((h, w, 4), dtype=np.uint8)
    result[:, :, :3] = image[:, :, :3]
    result[:, :, 3] = mask.astype(np.uint8) * 255
    return result
This gives a transparent-background style output, which is much easier to inspect than a raw binary mask.
Gradio Interface
Gradio made the deployment side much smoother. Instead of exposing a notebook or a rough script, I could wrap the whole experiment in a browser interface with an upload area, a drawing layer, a segment button, and an output preview.
import gradio as gr

def process(drawing, original):
    coords = extract_red_dot_coords(np.array(drawing["layers"][0]))
    if not coords:
        return original, "No point detected. Draw a red dot on the object."

    mask = segment(np.array(original), coords)
    result = apply_mask(np.array(original), mask)
    return result, f"Segmented at {coords[0]}"
I then connected that function to a simple Gradio layout with an original image input, an ImageEditor canvas for drawing the prompt point, and output components for the segmented result and status text. That was enough to turn the model into an interactive tool instead of a static experiment.
Benefits of This Approach
- Automated Feature Extraction: No need for manual coordinate input; extraction is data-driven from user drawings.
- Efficient Image Segmentation: Leverages deep learning to achieve high precision with zero-shot capability.
- Seamless Deployment with Gradio: Provides an easy-to-use web interface for users to interact with the model.
- Flexible Application: Can be extended to various segmentation tasks, from medical imaging to object detection.
Conclusion
By integrating SAM 2 with Gradio and leveraging NumPy-based processing, I streamlined the process of extracting segmentation coordinates and generating precise masks. This approach shows how foundation models become much more usable once the interaction layer is simplified.
The combination of SAM 2’s zero-shot capability and Gradio’s rapid UI deployment is powerful. You can build a working segmentation tool in under 100 lines of code that handles arbitrary objects without any fine-tuning.
If you want to see more of my applied AI work beyond this experiment, browse the full AI projects and case studies collection.